Alaska Living
Elias’s first salmon; A season of plenty
Elias and I headed out on his first salmon trip this morning. Waking at 4:30, Elias was groggy but excited. We drove an hour south to a creek that a neighbor friend had suggested as a kid-friendly salmon fishing hole. Arriving by six, we situated ourselves above an emerald-colored side stream teeming with salmon.
Elias hooked is first fish on the third cast. It was all Elias could do to keep his rod tip up and try to reel the fish in at the same time; eventually he gave up reeling and just started backing up the bank. The look of determination — and fear — on his face was priceless. Surprised that he caught one so quickly, I grabbed the net and hoisted the fish onto the shore. Elias beemed with pride.
Over the course of the morning we caught several other pink salmon.
(While not as good of eating as sockeye or coho, Elias was extremely proud to be bringing home fish for his family. In fact, on the walk back he commented, “We have so much meat for the freezer. We’ll be in good shape for the winter.”)
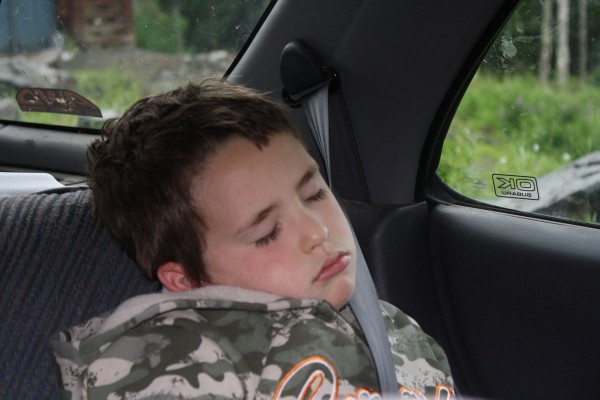
A couple of hours later, it was clear Elias’ arm was getting tired from so much casting, and we had caught his limit of fish. We headed back to the car, stopped at a local bakery for donuts and coffee, and headed home. Elias fell asleep within minutes.
Season of Plenty
Tonight we’re eating Elias’ salmon with home-grown dill, as well as broccoli and salad from the garden. It’s the season of plenty here in Alaska. It seems to last only a few weeks, but there is a feeling of abundance in the air. In a couple weeks it will be time to go moose hunting, butcher the chickens,and watch as the snow line slowly descends from the mountains.
An unwanted visitor, a little more meat in the freezer.
Last week Ashlee came out of the house, face to face with a black bear about 15ft away. Needless to say, it surprised her. The next night we heard the dog barking her “bear bark” whenever a bear is in the yard. We got up, but couldn’t see the bear. The next morning, I left the house to get some coffee and fill up the gas tank. Once I got back, I came inside for a about twenty minutes and then went out to check on my chickens. In the span of those twenty minutes, the bear had gotten into the trash (which had not been properly latched) and had spread garbage everywhere. Understandably, I was on edge to have the black bear visiting in the middle of the day.
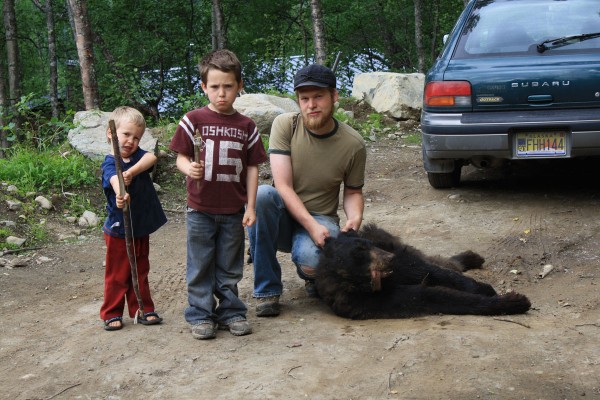
About two hours later, I came outside again, and there was the black bear, sitting in the yard looking at me. I ran inside, grabbed the gun, and shot him as he sauntered up our driveway. (Black bear hunting is open year-round where I live.) It was a clean shot and he didn’t go far.
The neighbor came over and helped me drag him into the driveway where I could butcher him.
This bear had been harassing the neighborhood for weeks. It had killed another neighbor’s chickens and had been getting way too close to humans. Upon skinning him, I found that this wasn’t the first time this bear had gotten himself into trouble either. I found 80-90 pieces of bird shot in his face and one of his front quarters. It had been there a while, so this bear had taken a shotgun blast to the face and had still not been deterred from eating garbage and killing chickens. Needless to say, a number of neighbors are glad to see him gone.
The meat is really good too! It’s the first bear I’ve eaten and it’s very mild, if a bit chewy. Above all, it’s nice not to have to worry about a troublesome bear in the yard with my kids.
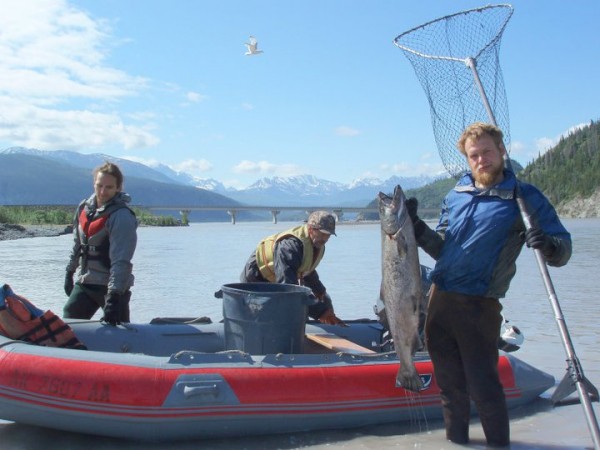
In other news, we’re done fishing for the year. I went dipnetting on the Copper River (with only marginal success) and spent a week dipnetting on the Kenai River, which is enjoying a record run. The freezer is getting full, the garden is starting to produce nicely, and there’s a tinge of fall in the air.
Next up: berry picking in order to make my annual currant-raspberry mead.
Excavators, cabbage, and bees.
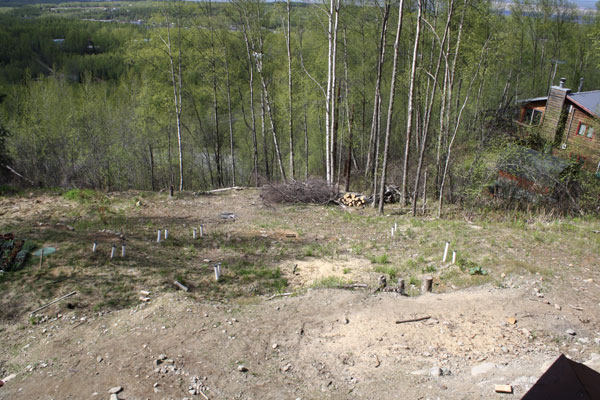
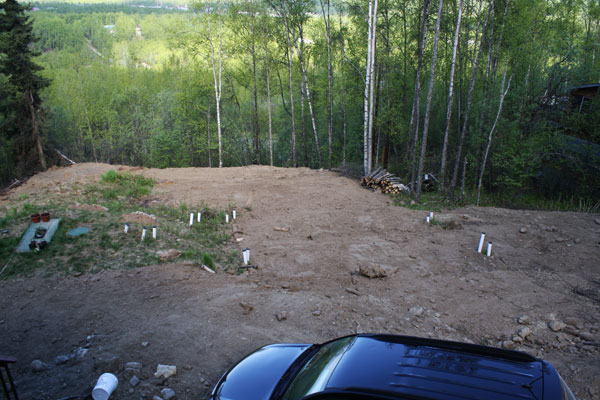
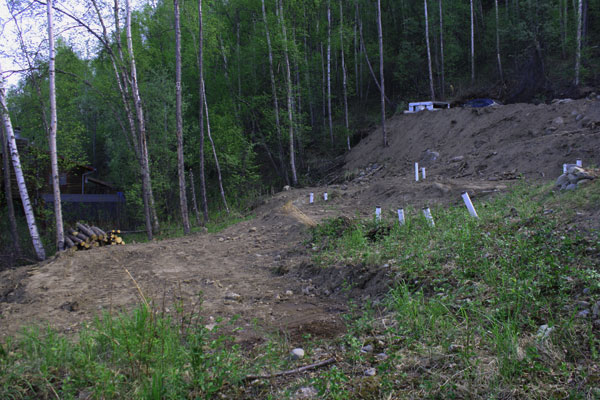
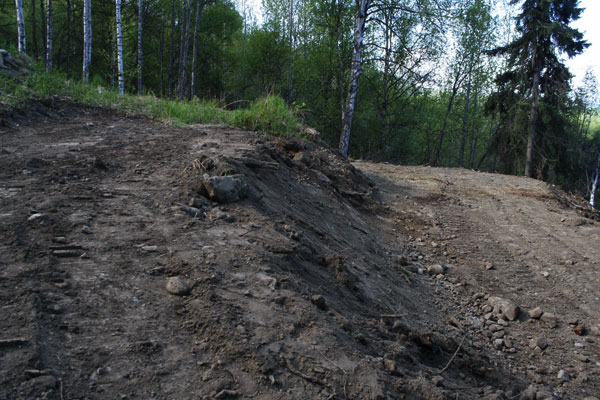
School got out last Friday, and I haven’t stopped moving since. Summers here in Alaska are way too short — and there’s far too much daylight — to slow down. I rented a big excavator this weekend to improve our yard and parking on our outrageously steep mountainside lot.
It’s tough to see, but we ended up terracing the whole yard into four large terraces. We finally have flat space to someday put in a garden, build a chicken coop, and build a greenhouse!
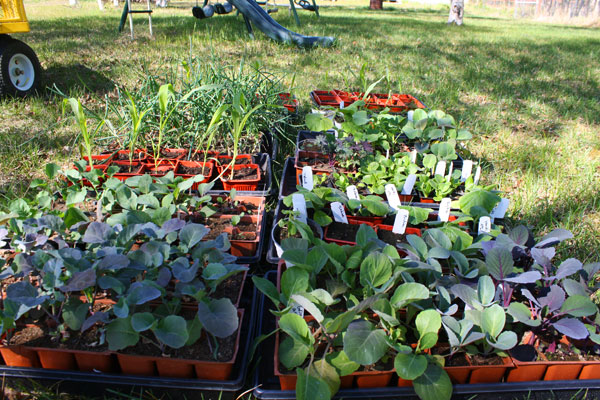
As if that weren’t enough, I put in my garden over the past two days…I may have gone a little overboard. I planted far more cabbage and broccoli than I ever have. I also planted more corn and pumpkins than last year, and tilled a large area to plant 60lbs of potatoes and some acorn squash.
The bees are doing well: I checked up on them a couple weeks ago (and again on Sunday) and the queen is laying eggs, which is a huge relief. The first flowers (dandelions) have blossomed, so the bees are busy gathering what nectar and pollen they can.
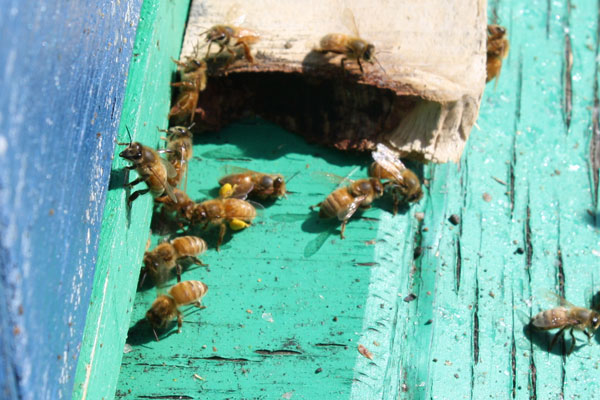
Notice the bee with the bright yellow balls of pollen on his back legs. They feed the pollen to the young.
Ashlee and the boys are fascinated by the bees. It sounds as if Ashlee is interested in being the family beekeeper next year. Elias wants to help too!
Because the adventures never end in Alaska, we’re in the process of packing up for our yearly halibut fishing trip: three days of camping on the beach and a year’s supply of delicious bottomfish!
I LOVE SUMMER!
“All of a sudden, my confidence turned to cold truth.”
Last Wednesday, I went to check on my bees. Confidently, I put on my makeshift beekeeping suit: my rain jacket, snow pants, hiking boots, leather gloves, and a cheap mosquito head net. Like a dutiful beekeeer, I brought over 25lbs of sugar, lovingly filled up their feeder, and watched my 14,000 cute, fuzzy children wander around in the hive.
But I couldn’t help help myself.
I wanted discover if I could see any bee eggs in the comb to make sure the queen was laying, even though I had just introduced the bees four days earlier.
I opened the top cover to reveal a swarming mass of honey bees, clearly bother by my intrusion. The entire colony buzzed at me angrily and dozens of them began to shoot themselves at me, landing on my headnet, hands, and arms.
I tried to get one of the frames out of the hive to check for eggs. Using my pry bar, I began to lift the frame out of the hive. As I attempted to lift it out, it broke with a sickening crunch, and a comb full of bees fell angrily to the bottom of the hive. Because the spacing is so tight in bee hives, I had to remove another frame full of bees before I could reach the broken frame. Gingerly, I brushed the bees off of the first frame, hoping I had not accidentally killed the queen.
Then I felt it: the soft tickling of insect feet on my skin. All of a sudden my confidence turned to cold truth.
Beekeeping books say that as a beekeeper, one is supposed to move slowly and methodically when working around bees. All such zen-like thoughts completely left me as I felt bee feet moving up my back. They had got in. Milliseconds later I felt the sting. And I did what any other rational person would do: I dropped everything and ran. Fast. Brutally punching myself in the back where I had been stung. I ran across the yard — a grown, bearded man in snowpants fleeing in terror from bugs. My sense of imperviousness (to say nothing of my sense of pride) had been shattered…
I think I’ll go back tonight, ask them for forgiveness, and offer them some sugar water.
A year later…
Lately I’ve been thinking a lot about the last year of my life. The past 12 months have brought a lot of exciting changes to my family and I, and something about the long daylight hours and the feel of spring is making me reflective.
This time last year, we were just moving into the house. We spent three long years building. My hand has touched every piece of wood, every wire, every nail that holds this house together. And although it seemed like an impossibly long project, I’ll never forget the feeling of sleeping in our house the first night. In our home. That we built.
It was about this time last year that I graduated from grad school. After a long and very intense year that took me away from my family and away from my passions, I remember the feeling of relief and accomplishment that I had made it through, and that I had met some extraordinary friends along the way.
Finally, it was about this time last year that we found out that Ashlee was expecting our third child…talk about a big surprise! I remember, before we found out she was pregnant, feeling that our family had finally come to a place of stability: I was going to be starting a career, the boys were no longer toddlers, and we were finally in our house. Everything was coming to a culmination at once.
Well, I guess we’re a family that needs adventure, because our third little adventure came into this world this past January. She’s amazing. I’m incredibly excited (and terrified) to have a daughter. She fits perfectly into our little family, and is such a sweet, sweet little baby. More than that, it’s amazing to see my wife with her. Ashlee’s calling in life is to be a mother, and there is nothing more pure and good and real in this whole world than the sight of my wife singing softly to my daughter. The other day, I watched them for an hour from the other room. The sunshine was falling over Ashlee’s shoulders and dark brown hair as she sat on the bed folding laundry. Aurora lay on one side of her and her laptop on the other. She kept playing “Tiny Dancer” on her computer, singing it softly to Aurora. I’ll never forget the way she smiled as she sang, love shining in both their eyes.
It’s been a really good year.
Thus begins my adventures in beekeeping…
I received my package of bees yesterday and put them in the hive. I have to say, the experience of dumping 4lbs of bees out of a box in front of me was…unsettling. But they’re cute little buggers, and it was pretty cold yesterday, making them pretty lathargic. More updates to come over the summer!
[portfolio_slideshow include=”447,449,448,452,453,456,457,454,451,455,450″]
Signs of Spring
It’s still gray and lifeless here in AK, but one can tell that the earth is almost trembling in anticipation of spring. So am I…
Chicken Coops Part II
It looks like the chicken coop is going to happen. We’re going to be renting an excavator this spring to finish up the landscaping, yard, and driveway, and we’ve cleared a spot for the coop. I’m going to teach summer school in order to have a chicken coop budget…
In other news, after I posted my plans for my coop, I got a couple of interesting responses.
The first is a narrative from Denny Reiter from Washington state. The document is really large, but it’s a great narrative of building his beautifully-crafted coop.
The second is a narrative from Steve McGroarty that was published in the Ester Republic many years ago. He lives in the Fairbanks region (which is much colder than down here in south central AK), and his experiences provide an amusing narrative. It’s printed below. (Thanks Steve!)
“We had talked about getting chickens for years. We had discussed what breeds and how many birds to get, meat birds vs. laying hens, whether to keep a rooster, where to build the coop, and that is where it always ended …. “the coop”. We couldn’t exactly run out and bring home a herd of chickens without a corral to put them in, could we? I’m pretty good at planning to do things and really good at designing things to build, but what I’m the absolute best at, is not building things.
I won’t go into detail about all the coops that I didn’t build, but suffice it to say, that I didn’t build some pretty nice chicken coops over quite a few years. In fact, I think that I didn’t build my first chicken coop way back in the mid-eighties when we were just starting to not build our first home up on Murphy Dome. We also spent three years in Juneau and with all that rain, designing and not building a coop in Juneau is quite a bit different than designing and not building a coop in Fairbanks!
I could have gone on for years happily designing and not building chicken coops were it not for an absent minded purchase that I made some three years ago. Have you ever gone to the store and when you get home wonder why you bought certain things? Well, I did that one day at the Alaska Feed Store and when I got home I wondered where I was going to put thirty small chicks. Two wooden boxes in the storage shed solved the immediate crisis, but I knew that my days of not building a chicken coop were numbered.
Unable to postpone construction any longer, we set about designing the coop. You didn’t really think that I could actually find any of those old designs, did you? We wanted both meat birds and laying hens, so I decided to build two coops. By starting two coops, I could delay completing one a little while longer. Hey, if you had spent as many years as I had designing and not building chicken coops, you could understand my hesitancy to suddenly bring an end to all that, but the chickens were starting to fly out of the boxes in the shed and do what chickens do best, all over the shed. Some screens placed over the boxes solved the immediate crisis, but it really was time to start building the coops.
Selecting a site for your chicken coop is almost like selecting a site for all of that stuff that you stockpile for not building your compost pile; you want it close enough for easy access, but you don’t want to smell it from your deck. It should also be close enough to run electricity out to the coop.
The meat bird coop was going to be faster to build than the one for the laying hens, so we started on it first. Speed of construction was starting to become an issue. The chicks were not so small any longer, and they were starting to somehow push the screens off the boxes in the shed. Some bricks on the screens over the boxes averted another immediate crisis, but even I had to admit that the time had finally come to build the coop.
I set the coop on a post-and beam foundation so that the floor was about three feet off the ground. The theory was that this would allow a wheelbarrow to be parked immediately under the door for easy cleaning the poop out of the coop. It wasn’t until the coop was completed and in operation, that I realized that you go into and out the coop every day and only use the wheelbarrow once every week or so. The daily access to the coop necessitated stairs since it was some three feet off the ground. The stairs prevented access for the wheelbarrow. In retrospect, it probably would have been less expensive and quite a bit faster to simply place a pair of rough-cut 4×4’s on concrete blocks, compared to setting four pressure-treated 4×4’s three-feet in the ground and cross-bracing them to withstand an 8.0 earthquake.
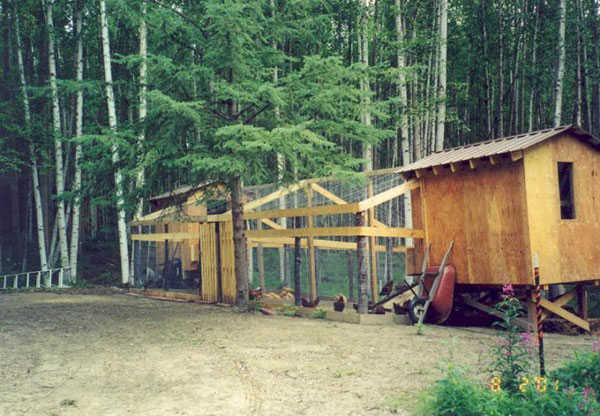
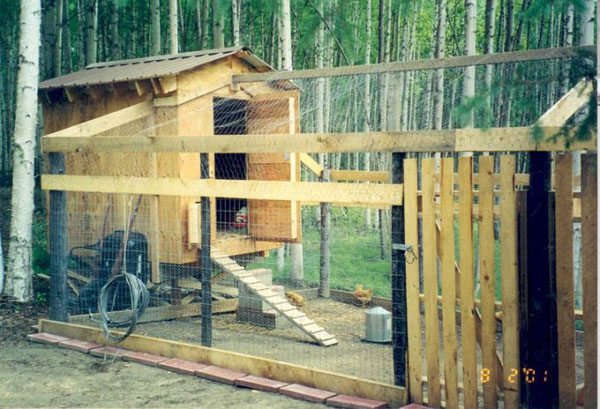 The floor of the coop was constructed using 2×6’s and ¾-inch plywood and was 6-feet wide by 8-feet long. The plywood floor was treated with copper napthenate wood preservative. The walls were 2×4’s on 24-inch centers with ½ -inch plywood sheeting. The side-walls were six-feet high and the center of the end-walls was about 8-feet in height. After the walls and roof were up, I screwed down a “sacrificial” piece of 3/8-inch plywood. Bears may go in the woods, but chickens go wherever and whenever they please and I wanted to make it easy to replace the floor when it inevitably rotted. I cut a 4-inch by 12-inch vent in the upper rear side-wall, covered the outside with 3/8-inch galvanized hardware cloth and utilized 1×4’s and a piece of plywood to form a sliding cover on the inside of this vent. I was then able to regulate the temperature and ventilation in the coop by adjusting how much of the vent was open. I located two horizontal 2×4’s in the back of the coop with a panoramic view out the window of the almost-built compost pile. With the construction of a small “chicken-door”, the coop was done. None too soon either as the chicks had started growling at me whenever I went in the shed for a tool.
The big day had finally arrived. The coop was completed and we transferred the now five-pound chicks to their new home. Never having experienced any space larger than their wooden boxes in the shed, they all immediately ran to a back corner of the coop and refused to use the roosts. A week later they were still “roosting” in the back corner of the coop on the floor. I built an access ramp so that the chickens could walk up to the roost. They wouldn’t use the ramp. We resorted to going out to the coop each night to pick up and place each of the thirty chickens on the 2×4 roosts. Fortunately for us, the chickens liked the view out the window and after a few nights of “training”, would race up the ramp to get the best spot on the roost. Another crisis solved.
While all this chicken training was going on, we were building the chicken yard. The yard is about 16-feet x 16-feet. We hoped to build the yard so that the chickens stayed in the yard and all manner of animals that dug, walked or flew (and liked to eat chickens) stayed out the yard. We treated the bottoms of some fire-killed spruce poles for fence posts. After setting the corner posts, we strung a string around the perimeter to locate additional posts and where the actual fence was going to be. To prevent the “four-legged diggers” from going under the fence, my dad pounded two-feet lengths of rebar every three inches along the entire outside fence line. I will leave it to you to calculate how much rebar this required. We tacked a five-feet high strip of chicken wire all round the perimeter of the yard to keep the chickens in and went over this with a strip of 2-inch x 4-inch welded wire fencing to keep the determined four-leggeds out, namely Sockeye, our husky-shepherd mix. We then installed rough-cut 1×6’s along the base, the top of the welded wire fencing and at the tops of the posts. To attach the wire to these boards we used countless horseshoe nails that were just small enough that you couldn’t start them without smashing your fingers about every twentieth nail. A couple of rough-cut 4×4 posts to support a 4×4 ridge beam and we could now cover the entire yard with chicken wire to complete the carnivore proofing.
Another big day had arrived for the chickens. We opened the chicken door, and they refused to come out into the yard. We opened the main door, and they walked up the edge of the floor and looked down into the yard. We built a chicken access ramp from the coop down to the yard and those smart chickens having learned how to use the ramp to get to their roost, proceeded to march down the ramp into the their new yard.
The coop and yard for the laying hens was a mirror image of the meat bird coop except for it being super-insulated. The floor was insulated with six inches of fiberglass insulation. The walls had four inches and the ceiling had six inches. After installing a vapor barrier, I added a one-inch layer of foil-covered foam insulation and covered this with 3/8-inch plywood. The main door, chicken door and sliding vent were all insulated with foam. A four-unit laying box was built and screwed to the wall about three-feet off the floor of the coop. Each unit was about one cubic foot in size. Having learned my lesson in the meat bird coop, I installed an access ramp to the roosts. I ran the ramp close to the laying box but didn’t run it all the way to the floor to make cleaning the floor easier. The coop was now ready for the ladies. The chickens thought that the top of the laying box was a great place to roost and do other chicken things. I used a pair of hinges to mount a piece of plywood to the wall above the box such that it was at a steep enough angle that the birds could not roost on it. The hinges allowed me to occasionally clean under the plywood. Another crisis was resolved and actually the slanted piece of plywood provided quite a bit of amusement for me as the chickens continued to try to roost on it!
Locating the laying box three feet off the floor reduced the chances of freezing eggs in the winter and allowed space underneath for a galvanized self-regulating water canister and a galvanized feed bucket for oyster shells. Placing these two units up off the floor of the coop on concrete blocks helps to keep them cleaner (if anything in a chicken coop can be thought of a clean) and reduces the likelihood of the water freezing. The chickens thought that this was a great place to roost and do other chicken things on the water and oyster shell buckets. I mounted a small plywood shelf under the laying box and above the buckets such that there was not enough room for the chickens to roost either above or below this shelf. Another crisis resolved.
The roof of both coops was supported by a beam, which provided a place to hang the galvanized self-regulating chicken food dispenser from a chain. We have found that by locating this on a chain, the chickens tend not to roost on it as it shifts under their weight and they apparently don’t like this. Locating the bottom of the feeder about eight inches off the floor provides easy access for the intake-end of the chickens and they tend not to scatter their feed quite as much.
We ran two electrical circuits from the house to both coops. One circuit is run to a switch located next to our back door and allows us to easily turn on lights inside and outside both of the coops. It is a really convenient system and well worth the extra effort to install. The second electrical circuit provides power to electrical outlets located in both coops. We have a 100-watt regular light bulb on a timer to provide 12-hours of light in the coop during the winter. When we rustle up a fresh herd of meat birds in the spring, it can still get cool at night, so we need to be able to use a 500-watt heat lamp on a thermostat. I was told that if you use the red heat lamp the chickens tend not to peck at each other quite as much. We use a similar set up in the laying coop to keep the water (and birds) thawed during the winter. Through trial and error, I discovered that for a given location and setting on the thermostat, I could adjust the sliding vent cover to maximize ventilation and thereby minimize the ammonia buildup that results from the out-put end of the chickens, while still keeping the water thawed. I have been able to calibrate the sliding vent and used a magic marker to mark the proper amount of opening for –20, -10, 0, +10 and +20 degrees. During the spring and fall when the chickens want to get out in the yard, but day-time temperatures are below freezing, we open the small chicken door, but close the vent. This prevents all the warm air from flowing up and out of the coop, which results in a frozen water container every time we forget.
This is our third winter with birds. Our coop seems to comfortably handle about 12 to 16 chickens. We get more fresh eggs than our family can use and have found that by selling the extras, we not only pay for the food and electricity, but the original cost of the coop construction should be paid back in only fifty or sixty years.
With both coops and yards finished, the chickens were happy and I was able to return to what I am really absolutely best at… not building the addition to our house, but that is another story.”
Winemaking with ingredients from Costco
This winter I’ve been experimenting with small batches of wine from ingredients I’ve found at Costco. Some of the experiments are definitely…experiments…but we’ve had some pretty good success too. Below are my winemaking notes for one gallon batches of the wines I’ve tried:

From left to right: pineapple wine, mixed berry wine, peach wine. (The peach is still cloudy because it's still so young.)
Mixed Berry Wine:
- 3 lbs Costco frozen mixed berries
- 3 1/2 lbs sugar
- 1 lbs raisins
- Bordeaux or fruit wine yeast
- 1/2 tsp pectin enzyme
- 1 1/2 tsp yeast nutrient
- 1 gallon water
Notes:
This is a fantastic table wine. We haven’t been able to keep a gallon of this around for more than a couple months because it tastes so good. The raisins give the wine some much-needed body, but it still has a muted, somewhat-sweet berry flavor. This would be a great table wine to serve to guests. We’ll be making a 5 gallon batch soon for this purpose. And the best part (with all these wines) is that once you have the brewing supplies, the cost of the actual ingredients comes out to $3 a bottle or less. That’s hard to beat for handcrafted, sulfite-free wine!
Strawberry Wine:
- 3 lbs frozen strawberries, blended.
- 3 1/2 lbs sugar
- Bordeaux or fruit wine yeast
- 1/2 tsp of pectin enzyme
- 1 1/2 tsp of yeast nutrient
- 1 gallon water
Notes:
Decent wine, but it was a little astrigent when new. (It was all gone within two months, so it didn’t have a chance to age!) I’m planning on trying it again with honey. It should balance the flavors better, I think.
Pineapple Wine:
- 3 lbs of chopped or crushed pineapple and syrup
- 3 lbs of sugar
- Bordeaux or fruit wine yeast
- 1/2 tsp pectin enzyme
- 1 1/2 tsp yeast nutrient
- 1 gallon water
Notes:
This wine, when young, tasted akin to canadian-bacon and pineapple pizza — notes of both pineapple and yeast. However, it’s super strong (18% alc by volume). Because it didn’t taste good new, it’s had time to age. It’s become a little drier and less yeasty. I’ll bottle some up and see what it’s like in a year, but I don’t plan to make it again.
Peach Wine
- 3 lbs canned peachesand syrup
- 3 1/4 lbs sugar
- Bordeaux or fruit wine yeast
- 1/2 tsp pectin enzyme
- 1 1/2 tsp yeast nutrient
- 1 gallon water
Notes:
This wine is still really young, but it has good potential. The peach flavor is fairly muted, and the wine is crisp and somewhat dry. I’ll let this age a few more months, but I’m optimistic of the final product.
On the to-do list:
- Canned Pear Wine
- Maybe some fresh fruit wines as it comes into season??
- Blueberry Wine
Note:
If you don’t know how to make your own wine, go my tutorial here. Just adapt the process for these recipes.


